IRF (Intelligent Resilient Framework) is an innovation from H3C. Hewlett-Packard has acquired the H3C switch-technology to build their new 5xxx series. This tutorial is based on the HP 5920AF-24XG Switch (JG296A) but it can be used also with 51xx/55xx switches. With IRF, you can virtualise all physical switches to one virtual-switch, so you have one management-ip, one switching- and routing-system and you can interconnect link aggregations over more than one device. Stacking the switches is very good for high availability environments (one ESX server can connect to multiple physical devices within one IRF stack) but also good for extending edge switches.
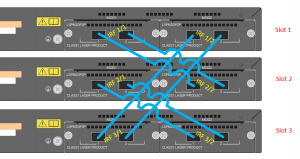
This picture shows the back of an 5120 switch with connected SFP+ modules. The modules are connected with DAC cable, they are cheaper as SFP+ GBICs and optical fiber:
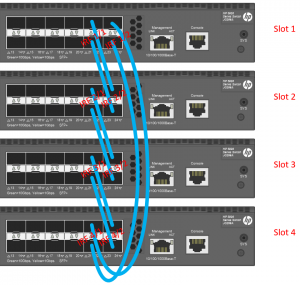
if you want to configure an IRF cluster, you need to use the SFP+ (10Gbit) ports. In our example, I will use two 5920 switches. Here is a picture of a four-devices-IRF-cluster:
you need to bind two physical interfaces to one IRF port to give enough backbone speed between two physical devices. The devices are also connected as a circle to avoid split-brain. This doesn’t need to be done if you have only two devices. Every port on the 5920 switch is a SFP+ 10Gbit port. We will use Port 21-24 for our IRF uplinks.
Physical devices are called “member”. First we will change our second device to member 2:
system-view
irf member 1 renumber 2
save
quit
reboot
y (yes to reboot)
you can check the MemberID after the reboot:
[HP]display irf
MemberID Role Priority CPU-Mac Description
*+2 Master 1 5c8a-38b0-bbcd ---
--------------------------------------------------
* indicates the device is the master.
+ indicates the device through which the user logs in.

The Bridge MAC of the IRF is: 5c8a-38b0-bbcc
Auto upgrade : yes
Mac persistent : 6 min
Domain ID : 2
you can also see that all interfaces are starting now with a “2”:
[HP]display int brief
Brief information on interface(s) under route mode:
Link: ADM - administratively down; Stby - standby
Protocol: (s) - spoofing
Interface Link Protocol Main IP Description
InLoop0 UP UP(s) --
M-GE0/0/0 DOWN DOWN --
NULL0 UP UP(s) --
REG0 DOWN -- --

Brief information on interface(s) under bridge mode:
Link: ADM - administratively down; Stby - standby
Speed or Duplex: (a)/A - auto; H - half; F - full
Type: A - access; T - trunk; H - hybrid
Interface Link Speed Duplex Type PVID Description
XGE2/0/1 DOWN auto A A 1
XGE2/0/2 DOWN auto A A 1
XGE2/0/3 DOWN auto A A 1
XGE2/0/4 DOWN auto A A 1
XGE2/0/5 DOWN auto A A 1
XGE2/0/6 DOWN auto A A 1
XGE2/0/7 DOWN auto A A 1
XGE2/0/8 DOWN auto A A 1
XGE2/0/9 DOWN auto A A 1
---- More ----
I configure always priorities to the switch members. The highest/best priority is “32”, so member 1 will get 32, member 2 will get 31 and so on. The default-value is 1.
irf member 2 priority 31
shutdown the interfaces (we will configure two IRF-ports/four physical ports for later extending):
irf-port 2/1
port group interface Ten-GigabitEthernet 2/0/21
port group interface Ten-GigabitEthernet 2/0/22

irf-port 2/2
port group interface Ten-GigabitEthernet 2/0/23
port group interface Ten-GigabitEthernet 2/0/24

interface range Ten-GigabitEthernet 2/0/21 to Ten-GigabitEthernet 2/0/24
undo shutdown

irf-port-configuration active

save
The IRF-Port configuration is ready. Don’t configure anything else on switches other than member 1 because your configuration will be deleted once the IRF stack will be connected. We will now update both switches:
Check your current version:
[HP]display version
HP Comware Software, Version 7.1.045, Release 2311P05

or

<HP>dir flash:/
and compare it online at the HP enterprise site. I downloaded the software for the device JG296A (5900AF-5920AF_7.10.R2418P06-B) and saved it to my TFTD32 root directory. Before updating the software and bios image, I recommend to backup your current software image:
interface vlan-interface 1
ip address 10.0.1.50 255.255.255.0

tftp 10.0.1.88 put 5900_5920-cmw710-boot-r2311p05.bin
tftp 10.0.1.88 put 5900_5920-cmw710-system-r2311p05.bin
normally HP delivers boot and system file in one compressed IPE file. That file will be extracted if you set this as your boot-loader file:
<HP>boot-loader file flash:/5900_5920-CMW710-R2418P06.ipe slot 2 main
Verifying image file.........Done.
Images in IPE:
5900_5920-cmw710-boot-r2418p06.bin
5900_5920-cmw710-system-r2418p06.bin
This command will set the main startup software images. Continue? [Y/N]:y
Add images to target slot.
Decompressing file 5900_5920-cmw710-boot-r2418p06.bin to flash:/5900_5920-cmw710-boot-r2418p06.bin...........................Done.
Decompressing file 5900_5920-cmw710-system-r2418p06.bin to flash:/5900_5920-cmw710-system-r2418p06.bin.......................Done.
you can let the old images on your device (in case there is enough disk space) or you can delete them. The parameter “unreserved” deletes the file permanently, otherwhise it will be moved to the trash:
<HP>delete /unreserved 5900_5920-cmw710-boot-r2311p05.bin
<HP>delete /unreserved 5900_5920-cmw710-system-r2311p05.bin
<HP>delete /unreserved 5900_5920-CMW710-R2418P06.ipe

<HP>dir
Directory of flash:
0 -rw- 11313152 Oct 28 2015 22:28:38 5900_5920-cmw710-boot-r2418p06.bin
1 -rw- 66527232 Oct 28 2015 22:31:05 5900_5920-cmw710-system-r2418p06.bin
now set the boot and system file:
boot-loader file boot flash:/5900_5920-cmw710-boot-r2418p06.bin system flash:/5900_5920-cmw710-system-r2418p06.bin slot 2 main
save
reboot
update all other physical devices to the same software version. Just change the slot number to the specific member number.
At last we will configure the member 1 device for IRF:
irf member 1 priority 32

interface range Ten-GigabitEthernet 1/0/21 to Ten-GigabitEthernet 1/0/24
shutdown

irf-port 1/1
port group interface Ten-GigabitEthernet 1/0/21
port group interface Ten-GigabitEthernet 1/0/22

irf-port 1/2
port group interface Ten-GigabitEthernet 1/0/23
port group interface Ten-GigabitEthernet 1/0/24

interface range Ten-GigabitEthernet 1/0/21 to Ten-GigabitEthernet 1/0/24
undo shutdown

irf-port-configuration active

save

reboot
after the reboot, connect port 1/0/21 to 2/0/23 and 1/0/22 to 2/0/24 (member 2 will reboot after this). After the successfull boot of member 2 you can check the devices with “display irf”. At last configure the fan directions (mostly I buy front to back fans):
fan prefer-direction slot 1 port-to-power
fan prefer-direction slot 2 port-to-power
now you can configure the right IP-address, default-gateway, link-aggregations, spanning-tree. To secure your device, configure a user for this:
user-group system

local-user admin class manage
password simple Th!s!$myP@ssw0rd
service-type ssh telnet terminal http https
authorization-attribute user-role network-admin
authorization-attribute user-role network-operator

ip http enable
ip https enable
feel free to write comments about configuration examples for the 5xxx-switch-series.


One Response
Important:
To use the ring topology, you must have a minimum of three member devices (as described in this article).
With two member a ring topology is not supportet, only a “daisy-chain” topology (one IRF port).
Nice greetings