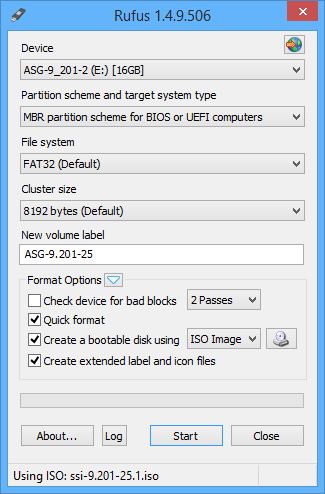
You don’t have a USB CD/DVD device nor a blank CD-ROM to burn the latest Sophos UTM ISO file? Here is a method to install the Sophos UTM via usb device. There are several free tools to copy an ISO image to an USB stick. In this tutorial I took the latest Rufus version which can be downloaded here. Rufus is available in many languages. Make sure that your USB stick doesn’t contain important data before flashing the device. Start the application and choose the latest iso (I took the hardware-appliance iso to install a new UTM 120 device):
In most cases, the UTM-hardware or a self-build device boots automatically from USB, otherwise you need to choose the boot device at start or change the boot priority. After you boot from the USB stick and hit enter to start the installation, you will get the error “install.tar wasn’t found on the installation media.”:
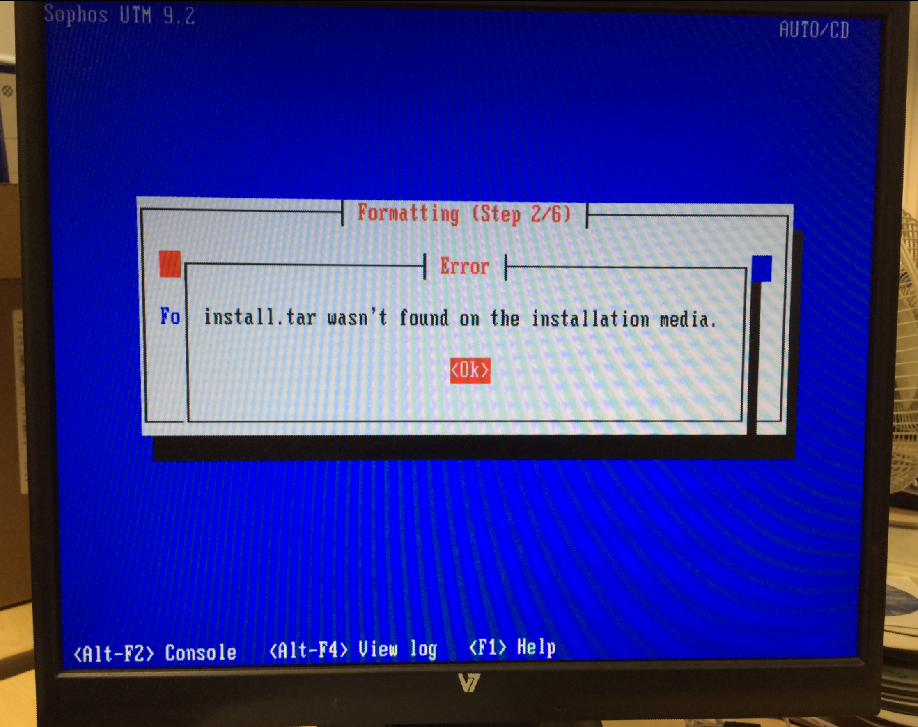
this is because the installation system doesn’t mount the usb device as an install medium. To do this, restart your hardware, boot from USB stick again and press Alt+F2 at the installation process. Now type in the following command to mount the usb device as source for install files (while in bash, the installation is going on, at first step the HDD will be formated so you have only a several time to do this before the installation wants to copy the installation-files):
mount /dev/sdb1 /install
press Enter and leave the bash with Alt+F1. The installation will work now, if not, write a comment ;)
/edit: You can find the XG USB tutorial here.


34 Responses
this work on the utm appliances? Last week i tried to re image a utm 220, with a external dvd rom, when start to boot from dvd you can see that the dvd is reading for once and anything else happened.
Hi Juank!
Yes It’s working, I did it again yesterday :)
When I type in the command I get a reply that says no such directory or file
Can you help
Norm Henri:
1. Du hast vor install das Leerzeichen vergessen?
mount /dev/sdb1(hier ein Leerzeichen)/install
2. du kannst in der Console mit fdisk -l
(also fdisk(Leerzeichen)-kleinesLudwig
… ganz unten bei Device Boot schauen, was da steht.
Normal steht dort /dev/sdb1
Thank you for saving my sanity Michel!
Hope you don’t mind an English version, Oliver?
I would to modify your instructions for the completely lost (aka: people like me!)
(Please note – the quotes around items are there just to pick them out as commands and keypresses)
1. Once you have convinced your system to boot to the USB. And after you have pressed the ‘Enter’ key to get the process running, when the option to go to the Console appears ‘ALT+F2’ (there’s no rush), go into the Console.
2. Type ‘fdisk -l’
3. Look at the devices listed. The last device in the list will be labelled smb. There will be a boot partition labelled smbx (where the ‘x’ is the number of your USB boot device. Mine in this case was 4. So my boot device was therefore smb4)
4. Type in the following replacing the ‘x’ with the device number you found after running the ‘fdisk -l’ command….
‘mount /dev/sdbx /install’
(my version of this was- ‘mount /dev/sdb4 /install’)
5. Type ‘ALT+F1’ to exit the Console.
6. Continue on your merry way installing Sophos UTM
Happy days!
Susi xx
Thanks for the quick guide. I was unsuccessfull with the install. I made it to the Alt+F2 screen. Entered the console, but neither command worked. fdisk -1 mount/dev/sdb1/install
I assume no spaces. I tried multiple times. I am using a supermicro mobo. I read somewhere that I have to have superuser access to write these commands. Is that true? How do I achieve this? Thanks
Hi patrick,
you assumed no spaces … and this is wrong.
1) fdisk(space)-l (last character is a letter (l like ‘lemon’) not a number
2) mount(space)/dev/sdb1(space)/install
3) During the install process the console (alt+f2) already has superuser rights.
Try this ways, it should work!
Finally thanks to Michel for original article
Did it work wih the help from Gigius?
Das Dateinamen-Problem weiter oben scheint zu entstehen, wenn Unetbootin zum Erstellen des Sticks genutzt wird. Dabei werden 5-6 Dateinamen bei 64 Zeichen abgeschnitten. Es sollte aber ein Fehlversuch reichen. Die fehlenden Teile sind immer gleich. Die betroffenen Dateien findet man, wenn man einfach im Explorer nach Dateinamen sortiert.
Ja, es funktioniert
– wenn man nach jedem Fehlversuch das Installations-Log nach abgeschnittenen Namen von RPM-Dateien durchsucht und diese im /install/rpm Verzeichnis auf dem USB-Stick nachpflegt.
Hi Michel,
your instructions are perfectly fine. I just used “mount /dev/sdb1 /install” as you said and the installation worked.
For whatever reason some guys here needed “fdisk”, it’s no longer avaiable in the latest version 9.306.
Cheers
I have tried the “mount /dev/sdb1 /install” but still get the install.tar was not found.
Which hardware do you have? While boot you press “Enter” after this there is a countdown, press Alt+F2 type in the command, press Enter and after this Alt+F1. It works always fine at my work.
On 9.306 I needed to do:
mount -t iso9660 /dev/sdb1 /install
Otherwise it said invalid argument. I guess fs detection isn’t present anymore?
Thanks a lot. Though the fdisk command isn’t recognized for some reason, I was able to use the mount /dev/sdb1 /install command to boot from the flash drive. This is really frustrating when I don’t keep CDs on hand anymore! Thanks again!
^^^ From my comment above, I thought it would be helpful to know that I installed 9.308 with just the /dev/sdb1 /install command.
First, my thanks sir for very clear instructions.
I tried this today using 9.308-16.1. The install runs all the way through to reboot without any errors, which is excellent :-). Sadly, however, when I remove the USB, reset BIOS to boot from HD first, the machine never boots. It sits at a blinking cursor on a black screen, with no disk activity and the IP address I told it to use for WebAdmin doesn’t respond to ping. If I can be a nuisance before tearing out what little hair I have left (blush), might you have any ideas?
Hmm did you used the hardware iso file? Which hardware do you have? Maybe you can try to start a partition manager to delete all partitions and install it again. I found this via google: http://www.partitionwizard.com/partition-wizard-bootable-cd.html
you can also try to take another partition boot manager, just delete the partitions.
I’d been struggling with this for ages – then I found this great post: worked perfectly, thank you!
worked for me :)
You made my day :-) Thank´s a lot – works great
it worked for me thanks!!!!!!!!!!!!!!!!!
Perfect
Hallo,
hat funktioniert.
Schade, dass Sophos das nicht offiziell auf seiner Seite dabei stehen hat…
https://community.sophos.com/kb/en-us/115879
Tipp von mir ergänzend dazu:
Ich habe mit 3 verschiedenen Tools probiert das Image zu schreiben. Alle 3 haben versagt. Über das Sophos-Forum habe ich noch den Hinweis zu dem Tool Rufus gefunden. Da wird der Stick auf anhieb richtig partitioniert.
https://rufus.akeo.ie/
Und dank deinem Blog hat auch das installieren dann final geklappt.
For the People where fdisk is not working and SDB1 is not your USB device.
In my case i found the right value with “blkid -o list” and for me it was sdc1 and not sdb1. After that the rest worked as described.
Hi,
Modell Sohpos UTM 110/120
I have remove the disk from Sophos and i have deleted all partition in another computer.
Mounted the disk again, and i’v puted the USB Stick with Sophos FW, and booted it.
After booting i have pressed only ALT+F2
“mount /dev/sdb1 /install” (i have only used the command “cd dev” and then “ls” to see the partitions.)
In this case the procedure worked fine with this model.
Thanks for the guide.
BR
Mr. Trent
läuft heute genauso… wahninn wie lange sowas mitgezogen wurde
Takk!!!